Creating a Login Widget
Create a login widget
Once your project is setup, replace the boilerplate code in main.dart with the following:
import 'package:flutter/material.dart';

void main() {
  runApp(MyApp());
}

// 1
class MyApp extends StatefulWidget {
  @override
  State<StatefulWidget> createState() => _MyAppState();
}

class _MyAppState extends State<MyApp> {
  @override
  Widget build(BuildContext context) {
    return MaterialApp(
      title: 'Workshop App',
      theme: ThemeData(visualDensity: VisualDensity.adaptivePlatformDensity),
      // 2
      home: Navigator(
        pages: [],
        onPopPage: (route, result) => route.didPop(result),
      ),
    );
  }
}
- We have changed out MyApp widget into a StatefulWidget. We will be manipulating its state later.
- The home widget of our MaterialApp is a Navigator which will allow setup our navigation in a declarative way.
Before we can add pages to our Navigator, we need to create the widgets that will represent each of our pages. Let’s start with the login page which we will put in a new file called login_page.dart in the /lib/ directory, this is the same directory as main.dart.
import 'package:flutter/material.dart';

class LoginPage extends StatefulWidget {
  @override
  State<StatefulWidget> createState() => _LoginPageState();
}

class _LoginPageState extends State<LoginPage> {
  // 1
  final _usernameController = TextEditingController();
  final _passwordController = TextEditingController();

  @override
  Widget build(BuildContext context) {
    // 2
    return Scaffold(
      // 3
      body: SafeArea(
          minimum: EdgeInsets.symmetric(horizontal: 40),
          // 4
          child: Stack(children: [
            // Login Form
            _loginForm(),

            // 6
            // Sign Up Button
            Container(
              alignment: Alignment.bottomCenter,
              child: FlatButton(
                  onPressed: () {},
                  child: Text('Don\'t have an account? Sign up.')),
            )
          ])),
    );
  }

  // 5
  Widget _loginForm() {
    return Column(
      mainAxisAlignment: MainAxisAlignment.center,
      children: [
        // Username TextField
        TextField(
          controller: _usernameController,
          decoration:
              InputDecoration(icon: Icon(Icons.mail), labelText: 'Username'),
        ),

        // Password TextField
        TextField(
          controller: _passwordController,
          decoration: InputDecoration(
              icon: Icon(Icons.lock_open), labelText: 'Password'),
          obscureText: true,
          keyboardType: TextInputType.visiblePassword,
        ),

        // Login Button
        FlatButton(
            onPressed: _login,
            child: Text('Login'),
            color: Theme.of(context).accentColor)
      ],
    );
  }

  // 7
  void _login() {
    final username = _usernameController.text.trim();
    final password = _passwordController.text.trim();

    print('username: $username');
    print('password: $password');
  }
}
- Since LoginPage requires user input, we need to keep track of that state by having a TextEditingController for each field on the screen; in this case: username and password.
- _LoginPageState.build will return a Scaffold that will allow our widgets to be formatted properly for a mobile device.
- It’s important to observe the SafeArea since the app will be capable of running on multiple devices. In this case, we’re also taking advantage of the minimum edge insets to add padding on both the left and right sides of the screen so the login form wont be from edge to edge.
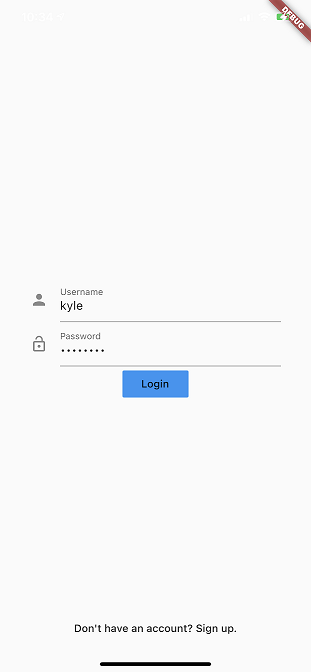
- Our UI will consist of the primary login form and a button at the bottom of the screen that will allow the user to sign up instead of login. We’re using a stack here to make it easier to manipulate the placement of each child widget.
- Creating a _loginForm function is completely optional, but it does declutter the build method a bit. Here we are implementing the UI for the username and password textfields, as well as the login button.
- Out sign up button will take the form of an interactive sentence that allows the user to sign up if they don’t already have an account. No onPressed functionality is implemented yet.
- The _login method will be responsible for extracting the values from the textfield controllers and creating an AuthCredentials object. Right now it is simply printing the values of each controller.
The UI of LoginPage is not finished, let’s add it to the Navigator in main.dart.
... // home: Navigator( (line 21)

pages: [MaterialPage(child: LoginPage())],

... // onPopPage: (route, result) => route.didPop(result),
The pages parameter takes a List<Page
Now we need to import login_page.dart so that LoginPage can be accessed from main.dart.
... // import 'package:flutter/material.dart'; (line 1)
import 'login_page.dart';
Now run the app (F5 in Visual Studio Code), this will usually take a few minutes to launch.